【BSP】Port RT-Thread on ST LoRa SoC——STM32WL
1 Foreword
RT-Thread is a powerful, component-rich open source operating system that combines features such as the STM32WL low-power combination to accelerate product development and landing by running RTOS in STM32WL.
This article focuses on how to port RT-Thread to the NUCLEO-WL55JC2 board and create a new RT-Thread-based NUCLEO-WL55JC2 BSP.
The main content of this article includes:
- Add STM32WL BSP
- Run the console finish
2 STM32 Series BSP Creation Process
RT-Thread officially offers very detailed documents that introduce the "STM32 Series BSP Creation Tutorial"
The structure of the STM32 BSP framework is shown in the following image:
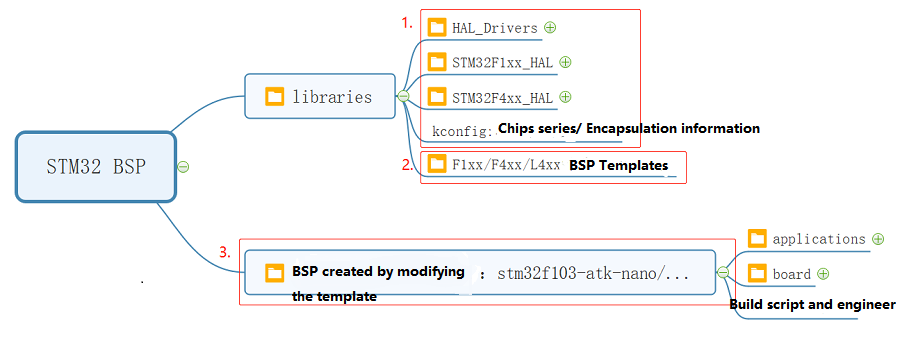
Each STM32 series of BSPs consists of three parts: a universal library, a BSP template, and a specific board BSP.
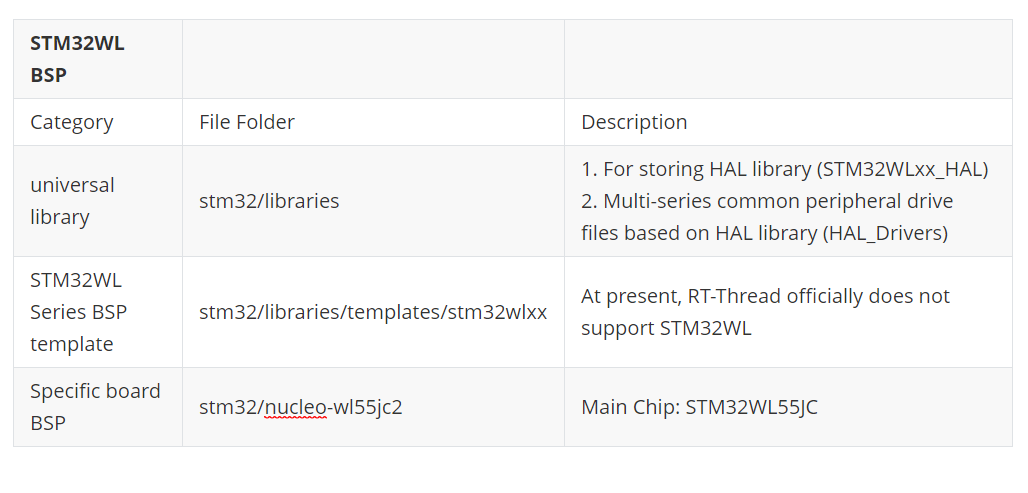
- For storing HAL library (STM32WLxx_HAL) 2. Multi-series common peripheral drive files based on HAL library (HAL_Drivers) |
| STM32WL Series BSP template | stm32/libraries/templates/stm32wlxx | At present, RT-Thread officially does not support STM32WL |
| Specific board BSP | stm32/nucleo-wl55jc2 | Main Chip: STM32WL55JC |
3 STM32WL BSP Creating
Since RT-Thread does not currently support STM32WL, the creation process for the STM32WL BSP is as follows:
Add STM32WL support at stm32.libraries
- Add STM32WLxx_HAL
Update HAL_Drivers
- STM32WL is close to STM32L4, so this section can refer to STM32L4
Add NUCLEO-WL55JC2 BSP
- Modify project-related files (Kconfig,SConstruct,SConscript,link script)
Configurations
- The current SetupSTM32CubeMX-6.99.1-D37 does not currently support C code export and currently requires manual modification
3.1 Add STM32WL support at stm32/libraries
3.1.1 Add STM32WLxx_HAL
Add STM32WLxx_HAL and its associated driver files in bspstm32libraries.
- Create STM32WLxx_HAL in rt-thread/bsp/stm32/libraries
Copy the following 2 files to STM32WLxx_HAL
- STM32Cube_FW_WL_V0.4.0DriversSTM32WLxx-HAL-Driver
- STM32Cube_FW_WL_V0.4.0DriversCMSIS
- Add SConsript files to the STM32WLxx_HAL folder
- Add SOC_SERIES_STM32WL in the Kconfig of the bspstm32libraries.
3.1.2 Update HAL_Drivers
Add SOC_SERIES_STM32WL to Kconfig in bspstm32librariesHAL_Drivers.

Add STM32WL to drv_config.h in bspstm32librariesHAL_Drivers.
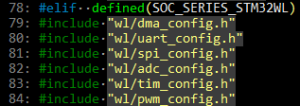
Add the wl folder at bspstm32librariesHAL_Driversconfig (copy the files in STM32L4 directly and then modify them accordingly)
- In drv_xx.c. .drv_xx.h, where SOC_SERIES_STM32L4 occurs, increase the SOC_SERIES_STM32WL condition judgment
- For example

3.2 Add NUCLEO-WL55JC2 BSP
Add stm32wl55-st-nucleo at rt-threadbspstm32 path.(Copy stm32l476-st-nucleo)
3.2.1 Modify the project construction related files ((KconfigSConstructSConscriptlink script)
- Modify bspstm32stm32wl55-st-nucleoboardKconfig, define the chip model SOC_STM32WL55JC,Chip series is SOC_SERIES_STM32WL

- Modify bspstm32stm32wl55-st-nucleoboardSConstruct. This step is critical to determining the actual import of the stm32 HAL library for the project

- Modify bspstm32stm32wl55-st-nucleoboardSConscript. The SConscript script determines the generation of the MDK/IAR project and the addition of files during compilation, and the SConscript script needs to modify the chip model and the address of the chip boot file, as shown below

- Modify template.uvprojx file at bspstm32stm32wl55-st-nucleo. Template file is a template file for generating MDK/IAR projects, which can be modified to set the type of chip used in the project as well as download methods, etc.
Note: You'll need to install STM32WLxx_DFP if you don't have one.
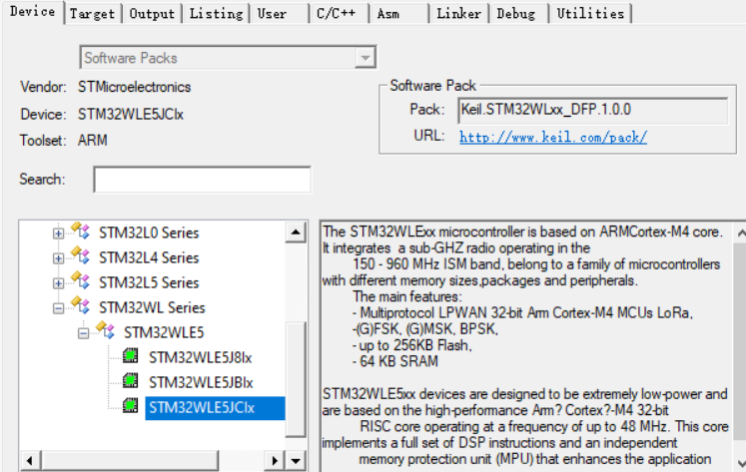
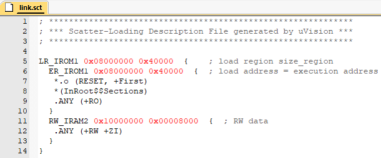
- Modify bspstm32stm32wl55-st-nucleoboardlinker_scripts link script file, MDK is using link.sct as shown below:
3.2.2 Configure Project
3.2.2.1 Modify the size of board.h FLASH and SRAM
- Modify bspstm32stm32wl55-st-nucleoboardboard.h file, and the size of Flash and SRAM.

3.2.2.2 Modify SystemClock_Config
- SystemClock_Config() is store in In board.c file, for which you can refer to: STM32Cube_FW_WL_V0.4.0ProjectsNUCLEO-WL55JCApplications.
3.2.2.3 Modify CubeMX_Config
As CubeMX doesn't fully support STM32WL, some files of CubeMX_Config needs configurations.
- stm32wlxx_hal_msp.c add LPUART1 initialization.
/**
* @brief UART MSP Initialization
* This function configures the hardware resources used in this example
* @param huart: UART handle pointer
* @retval None
*/
void HAL_UART_MspInit(UART_HandleTypeDef* huart)
{

  GPIO_InitTypeDef GPIO_InitStruct = {0};
  if(huart->Instance==LPUART1)
  {
  /* USER CODE BEGIN LPUART1_MspInit 0 */

  /* USER CODE END LPUART1_MspInit 0 */
    /* Peripheral clock enable */
    __HAL_RCC_LPUART1_CLK_ENABLE();

    __HAL_RCC_GPIOC_CLK_ENABLE();
    /**LPUART1 GPIO Configuration
    PA3     ------> LPUART1_RX
    PA2     ------> LPUART1_TX
    */
    GPIO_InitStruct.Pin = GPIO_PIN_2|GPIO_PIN_3;
    GPIO_InitStruct.Mode = GPIO_MODE_AF_PP;
    GPIO_InitStruct.Pull = GPIO_NOPULL;
    GPIO_InitStruct.Speed = GPIO_SPEED_FREQ_VERY_HIGH;
    GPIO_InitStruct.Alternate = GPIO_AF8_LPUART1;
    HAL_GPIO_Init(GPIOA, &GPIO_InitStruct);

  /* USER CODE BEGIN LPUART1_MspInit 1 */

  /* USER CODE END LPUART1_MspInit 1 */
  }

}

/**
* @brief UART MSP De-Initialization
* This function freeze the hardware resources used in this example
* @param huart: UART handle pointer
* @retval None
*/

void HAL_UART_MspDeInit(UART_HandleTypeDef* huart)
{

  if(huart->Instance==LPUART1)
  {
  /* USER CODE BEGIN LPUART1_MspDeInit 0 */

  /* USER CODE END LPUART1_MspDeInit 0 */
    /* Peripheral clock disable */
    __HAL_RCC_LPUART1_CLK_DISABLE();

    /**LPUART1 GPIO Configuration
    PA0     ------> LPUART1_RX
    PA1     ------> LPUART1_TX
    */
    HAL_GPIO_DeInit(GPIOA, GPIO_PIN_2|GPIO_PIN_3);

  /* USER CODE BEGIN LPUART1_MspDeInit 1 */

  /* USER CODE END LPUART1_MspDeInit 1 */
  }

}- ENV--> menuconfig, using PUART1 (NUCLEO-WL55JC2 to configure Console/Finish which default using LPUART1 connects to ST-LINKV3 virtual serial port)

Once this is done, the MDK project is generated using the SCons tool
3.3 Test validation
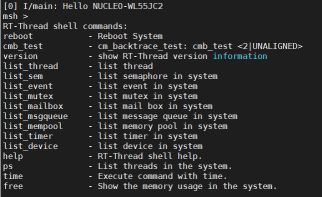
Connect NUCLO-WL55JC to PC via Micro USB, download code to NUCLEO-WL55JC via on-board STLINKV3E, and verify if Finish available through serial ports.


Forwarded from RT-Thread Community Developer ForestRain