Learn to make RT-Thread packages starting from making LED
Forwarded from RT-Thread Community Developer luckydarcy.
Preparation
Build Environment
- Download RT-Thread source code
- Install RT-Thread Env ENV
- Select a BSP package for testing
Collect the requirements of making the packages.
Collect the package's requirements based on the package you want to make.
For example, we want to make a software package that controls LED flickering, and we want it to have the following functions:
- Control LED on or off;
- Control the LED flashing time;
- Control the frequency of LED flicker;
- Control the number of LED flashes;
- ......
Meanwhile, we have the following requirements for the use of packages:
- Support for multi-LEDs;
- The interface is simple, just like
LOG_Xand you can do it in one line of code if you want to trigger an LED action.
This phase must be point-to-point, pick out the most basic and important functions, and then abstract further.

Don't forget to pick up a nice name for the package
We decided to implement it on a list and named the package "littled", an acronym for Little LED Daemon, which means a compact LED-driven service program. We want it to work like a background service program, making it easy to call the application layer.
Create a remote code repository
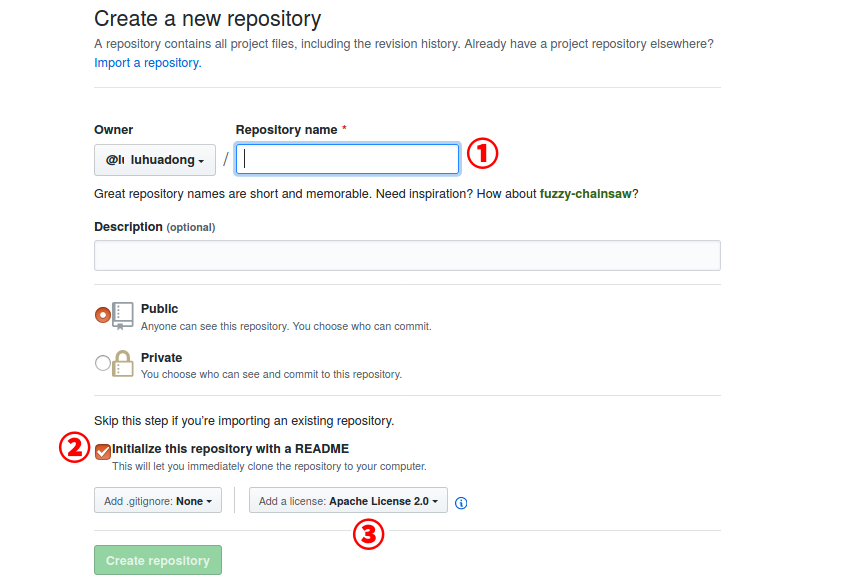
Create a repository called rtt-littled on GitHub, select an open source license agreement, and add README.md files. Done.
Build a local package project
Clone the remote repository you just created to local!
git clone git@github.com:luhuadong/rtt-littled.gitEnter the local repository and create 3 directories
cd rtt-littled
mkdir src inc examples
Where the src directory holds the source file, the inc directory holds the header file, and the examples directory holds the sample code. The appropriate files are then created in each directory and an SConscript file is added to guide the compilation. The final directory framework is as follows:
├── examples
│   └── littled_sample.c
├── inc
│   └── littled.h
├── src
│   └── littled.c
├── LICENSE
├── README.md
└── SConscript
Implement package functionality
Software architecture design
The littled package takes a C/S-like architecture, and the littled background thread receives requests from the user thread and parses and responds to them, creating subtask threads to process requests that require continuous action and then continuing to wait for them.
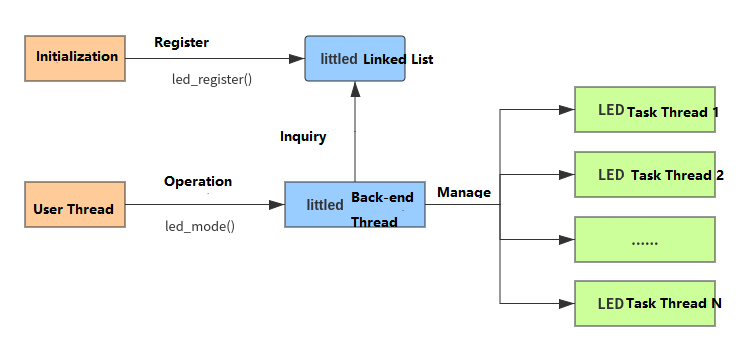
littled maintains a list internally that records LED device information and inserts LED nodes into the list during initialization to meet the need to support any number of LEDs.
Define the interface function
Sign up and log out
Registering LEDs requires only a pin number and a valid level.
int led_register(rt_base_t pin, rt_base_t active_logic);The parameter pin represents the LED pin number, and the parameter active_logic represents the level logic value (between the PIN_HIGH or PIN_LOW). Registration successfully returns an LED descriptor greater than 0, and registration failure returns an error code less than 0.
For registered LEDs, they can be logged out when they are not required.
void led_unregister(int ld);Argument ld represents the LED descriptor that will be logged out.
Set the LED mode
LED mode includes on, off, flipped, flashing, defining led_mode all of them. Control LED flicker in a software-simulated PWM manner.
int  led_mode(int ld,
              rt_uint32_t period,
              rt_uint32_t pulse,
              rt_uint32_t time,
              rt_uint32_t count);
The parameter ld represents the LED descriptor, the parameter period represents the cycle time, the parameter pulse represents the pulse width (high-level duration), the parameter time represents the duration of the flicker, and the parameter count represents the number of flashes.
The LED goes out when pulse is 0, and the LED is always on when pulse=period.

Write test code
Before we implement the interface function, let's write the test code. This has two benefits, one is a clearer picture of how we want to use it, and the other is that we can test the interface function while implementing it, just implementing the functionality, and avoid overexploitation, i.e. test-driven development (TDD).
#define LED1_PIN        GET_PIN(C, 7)

static int littled_sample(void)
{
    int led_test = led_register(LED1_PIN, PIN_HIGH);

    LED_ON(led_test);          /* on */
    rt_thread_mdelay(3000);
    LED_OFF(led_test);         /* off */
    rt_thread_mdelay(3000);
    LED_BEEP(led_test);        /* Flash three times */
    rt_thread_mdelay(5000);
    LED_BLINK(led_test);       /* Flash all the time */

    led_unregister(led_test);
}
#ifdef FINSH_USING_MSH
MSH_CMD_EXPORT(littled_sample, Driver LED based on littled);
#endif
Several patterns are pre-defined for ease of call:
#define LED_ON(ld)           led_mode(ld, 1, 1, 0, 0)
#define LED_OFF(ld)          led_mode(ld, 1, 0, 0, 0)
#define LED_TOGGLE(ld)       led_mode(ld, 0, 0, 0, 1)
#define LED_BEEP(ld)         led_mode(ld, DEFAULT_PERIOD,   DEFAULT_PULSE,   0, BEEP_COUNT)
#define LED_BELL(ld)         led_mode(ld, DEFAULT_PERIOD,   DEFAULT_PULSE,   BELL_TIME, 0)
#define LED_BLINK(ld)        led_mode(ld, DEFAULT_PERIOD,   DEFAULT_PULSE,   0, 0)
#define LED_BLINK_FAST(ld)   led_mode(ld, DEFAULT_PERIOD/2, DEFAULT_PULSE/2, 0, 0)
#define LED_BLINK_SLOW(ld)   led_mode(ld, DEFAULT_PERIOD*2, DEFAULT_PULSE*2, 0, 0)
The specific code implementation
Specific data structure definitions and function implementations, see the code:https://github.com/luhuadong/rtt-littled
Modify the SConscript file
There are fewer files in the littled package, so just specify the file name directly
from building import *
Import('rtconfig')

src   = []
cwd   = GetCurrentDir()

# add littled src files.
if GetDepend('PKG_USING_LITTLED'):
    src += Glob('src/littled.c')

if GetDepend('PKG_USING_LITTLED_SAMPLE'):
    src += Glob('examples/littled_sample.c')

# add littled include path.
path  = [cwd + '/inc']

# add src and include to group.
group = DefineGroup('littled', src, depend = ['PKG_USING_LITTLED'], CPPPATH = path)

Return('group')
When it gets done, you can commit the code to the remote repository for subsequent testing.
Test
Build the package index
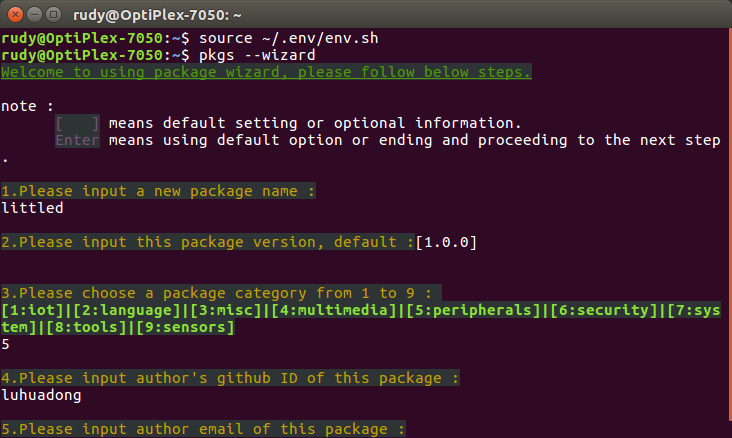
RT-Thread's Env tool gives us the wizard to automatically generate package indexes. The command is as follows:
pkgs --wizardThe approximate process is shown in the following diagram, entering the Package name, version number, category, Git repository information...
Modify the package index
When the last execution is complete, a littled directory is generated with two files, Kconfig and package.json, but further machining is required.
Add configuration items for the littled package in Kconfig, such as default cycle time, pulse width, and so on.
if PKG_USING_LITTLED

    config PKG_USING_LITTLED_PERIOD
        int "default pwm period (ms)"
        default 1000

    config PKG_USING_LITTLED_PULSE
        int "default pwm pulse (ms)"
        default 500

    config PKG_USING_LITTLED_BELL_TIME
        int "default bell time (ms)"
        default 50000

    config PKG_USING_LITTLED_BEEP_COUNT
        int "default beep count"
        range 1 100
        default 3

    config PKG_USING_LITTLED_SAMPLE
        bool "Enable littled sample"
        default n
The package.json file is primarily a modification of the latest version information.
{
    "version": "latest",
    "URL": "https://github.com/luhuadong/rtt-littled.git",
    "filename": "littled-latest.zip",
    "VER_SHA": "master"
}
Test the package locally
Add the package index to the packages corresponding to Env.
cp -r rtt-littled ~/.env/packages/packages/peripherals/Also modify the Kconfig file under peripherals and add the Kconfig for littled, otherwise menuconfig won't find it.
source "$PKGS_DIR/packages/peripherals/littled/Kconfig"Add the package to the project, perform scons --menuconfig in the BSP engineering directory, and configure the path as follows:
RT-Thread online packages --->
    peripheral libraries and drivers --->
    [*] littled: Little LED Daemon for LED driver  --->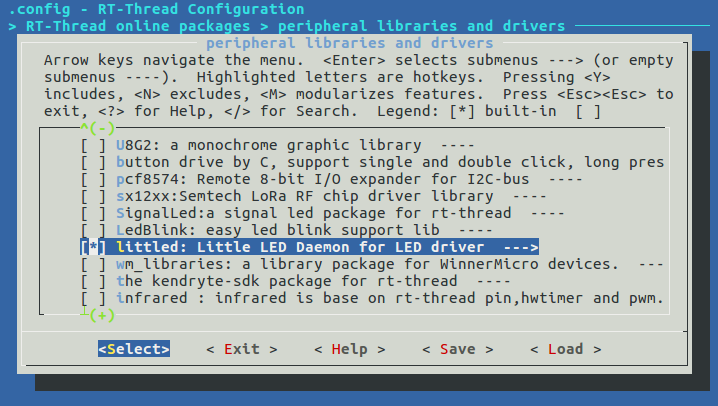
Save the configuration and perform the pkgs --update to pull package. If the pull is successful, the package index information is correct.
Compile, test, debug, optimize
The package is successfully pulled, you can select the test sample to compile, compile successfully downloaded to the board for testing. If you have a problem, you can repeat the steps above to modify the code, submit, and test until the functional requirements are met.
Release
Release the package version
The littled package passes the test and submits the code to the GitHub remote repository.
cd littled
git add .
git commit -m "v1.0.0"
git push origin master
At the same time, fork RT-Thread's packages repository and clone to the local.
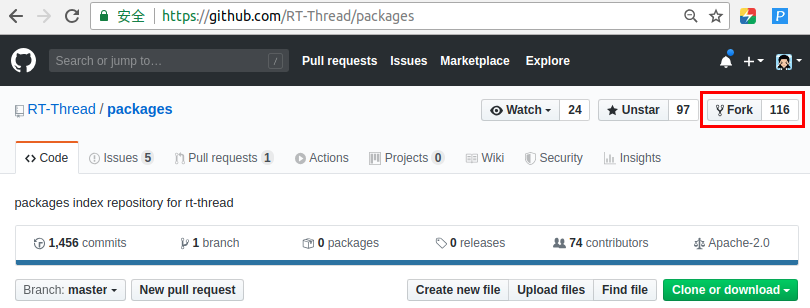
To facilitate the submission of PR, it is recommended to create a branch in the packages local repository
git checkout -b developThe littled package index directory is then copied to the peripherals directory and the modifications for the persys/Kconfig are updated.
git add .
git commit -m "add littled"
git push origin develop
Pull Request
To complete the next step, find the corresponding submission on the GitHub page and you can see the prompts for Pull Request. Once you have confirmed that the branch and submission information are correct, you can submit the PR to RT-Thread's packages repository.
Then let's waiting for merging the code.

