How to Enable the CCS811 Gas Sensor in RT-Thread?
1、CCS811 Sensor
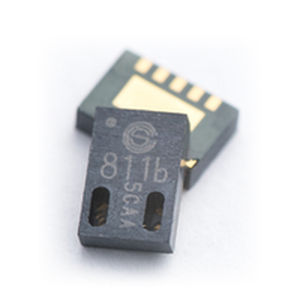
The ccs811 package is the drive package for the CCS811 gas sensor. The CCS811 is a low power consumption digital gas sensor designed to detect low levels of volatile organic compounds and co2 concentrations in the room, internally integrated microcontroller units (MCUs) and Analog-to-digital converters (ADCs), and provide CO2 or TVOC data via standard I2C digital interfaces.
The CCS811 module supports the I2C interface and the IIC address can be configured as 0x5A or 0X5B.

The CCS811 supports a variety of modes: every 1 second, 10 seconds, 1 minute, 250 millisecond measurements, and sleep modes, which are optimized for low power consumption during sensor measurements, making the CCS811 suitable for portable applications. The CCS811 supports concentration alarms, and the INT pin triggers when the concentration exceeds the user-set threshold.
Note: The chip has clock extensions to IICs, and some controllers do not support clock extensions, such as Raspberry Pi.
1.1 Specification
- Supply voltage: 3.3V to 5.5 V
- Warm-up time: <15s
- IIC address: 0x5A or 0X5B
- Operating temperature range: -40C to 85C
- Working humidity range: 10%RH to 95%RH
- eCO2 measurement range: 400ppm to 8000ppm
- TVOC measurement range: 0ppb to 1100ppb
- Product size: 22 x 31mm
1.2 Features
- Integrated MCUs
- On-board handling
- Standard digital interface
- Optimized low-power mode
- IAQ threshold alarm
- Programmable baseline-2.7mm x 4.0mm LGA package
- Low number of components
- Mature technology platform
1.3 Application
- In-car air quality testing
- Indoor air quality testing
- Air purifier
- Home controller
- New wind system
2、Use ccs811
2.1 Add software package
In order to quickly integrate the CCS811 sensor in the project, I've created the RT-Thread-based ccs811 package.
GitHub Address: https://github.com/luhuadong/rtt-ccs811.
With the ccs811 package, you need to select it in RT-Thread's package manager, as follows:
RT-Thread online packages --->
    peripheral libraries and drivers --->
        [*] sensors drivers  --->
            [*] CCS811: Digital Gas Sensor for Monitoring Indoor Air Quality..
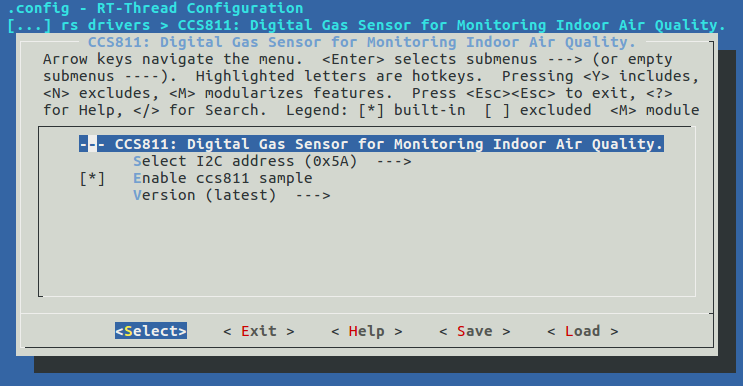
Open the RT-Thread Env tool and execute pkgs --upgrade to update RT-Thread package index. When the update is completed, configure menuconfig in your BSP engineering directory and add the ccs811 package, as shown in the following image.

Then let the RT-Thread's package manager update automatically, or update the package to the BSP using the pkgs --update command.
2.2 Configuration options
The ccs811 package currently offers two configuration options:
- Select I2C address (
PKG_USING_CCS811_I2C_ADDRESS) - Whether to use the sample program (
PKG_USING_CCS811_SAMPLE)
Depending on the actual hardware connection of the CCS811, the user can select an I2C address of 0x5A or 0x5B.
3、Test
3.1 Compile & Download
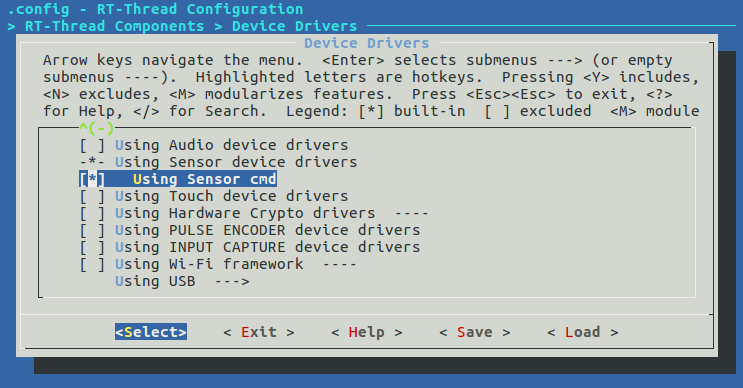
A test example is provided in the ccs811 package, simply tick "Enable ccs811 sample" in the menuconfig configuration. In order to complete the test, you also need to turn on the "Sensor cmd" function.

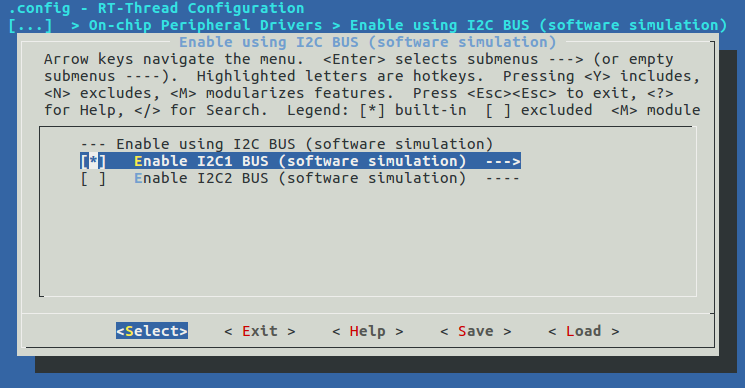
Btw, don't forget to configure the I2C bus! The example of the ccs811 package uses i2c1 by default, so I2C1 Bus needs to be configured in menuconfig.

Once configured, you can compile and download to the board.
3.2 Initialize the sample code
As RT-Thread provides the Sensor drive frame, and the ccs811 is already connected to the Sensor framework, you only need to register the sensor device to complete the initialization, as shown below:
static int rt_hw_ccs811_port(void)
{
    struct rt_sensor_config cfg;

    cfg.intf.type = RT_SENSOR_INTF_I2C;
    cfg.intf.dev_name = CCS811_I2C_BUS_NAME;
    rt_hw_ccs811_init("cs8", &cfg);

    return RT_EOK;
}
INIT_COMPONENT_EXPORT(rt_hw_ccs811_port);
This step is already include in sensor_ccs811_sample.c sample. So we don't need to write any code!
3.3 Use the sensor command
If all goes well, we can go to the msh terminal.
3.3.1 Check if the sensor is successfully initialized
Enter list_device to see if the CCS811 sensor is registered. If you see the following information, it presents registered and the sensor initialization was successful.
msh >list_device
device           type         ref count
-------- -------------------- ----------
tvoc_cs8 Sensor Device        0
eco2_cs8 Sensor Device        0
You'll see two devices, tvoc_cs8 and eco2_cs8, because the CCS811 module detects two types of gas data (TVOC and CO2), so they are registered as two devices in RT-Thread.
3.3.2 View CCS811 information
After the sensor is successfully initialized, we can test it with the sensor command! The sensor probe command is used to detect the sensor device, and the command is followed by the device name.
msh >sensor probe tvoc_cs8
[4774993] I/sensor.cmd: device id: 0x81!
The sensor device is also selected by the sensor probe command, which can then be operated using commands such as sensor info or sensor read .
For example, to view device information:
msh >sensor info
vendor    :AMS
model     :ccs811
unit      :ppb
range_max :32768
range_min :0
period_min:250ms
fifo_max  :1
3.3.3 Read TVOC data
The value of the TVOC can be read by executing sensor read .
msh >sensor read
[4794468] I/sensor.cmd: num:  0, tvoc:  184 ppb, timestamp:4794468
[4794586] I/sensor.cmd: num:  1, tvoc:  184 ppb, timestamp:4794586
[4794704] I/sensor.cmd: num:  2, tvoc:  184 ppb, timestamp:4794704
[4794822] I/sensor.cmd: num:  3, tvoc:  184 ppb, timestamp:4794822
[4794940] I/sensor.cmd: num:  4, tvoc:  184 ppb, timestamp:4794940
3.3.4 Read CO2 data
Since the tvoc_cs8 device is selected earlier, in order to read the value of CO2, we need to execute the sensor probe eco2_cs8 switching device before executing the sensor read reading sensing data.
msh >sensor read
[4957632] I/sensor.cmd: num:  0, eco2:  871 ppm, timestamp:4957632
[4957850] I/sensor.cmd: num:  1, eco2:  865 ppm, timestamp:4957850
[4957968] I/sensor.cmd: num:  2, eco2:  865 ppm, timestamp:4957968
[4958086] I/sensor.cmd: num:  3, eco2:  871 ppm, timestamp:4958086
[4958303] I/sensor.cmd: num:  4, eco2:  871 ppm, timestamp:4958303
3.4 Use custom interface testing
ccs811 provides us with two interfaces, one custom and the other docking to the RT-Thread Sensor framework. An cat_ccs811 example is also provided in the sample code for the ccs811 package, using a custom interface, and the test results are as follows.
msh >cat_ccs811
[20] TVOC: 0 ppb, eCO2: 0 ppm
[19] TVOC: 9 ppb, eCO2: 465 ppm
[18] TVOC: 11 ppb, eCO2: 475 ppm
[17] TVOC: 11 ppb, eCO2: 475 ppm
[16] TVOC: 11 ppb, eCO2: 477 ppm
==> baseline: 0x8484
...
